Over the weekend, I spent several hours putting some new lessons together for the Practical Life and Art shelves. Ordinarily, I have some sort of plan when it comes to what will be used such as theme-related (i.e. seasons, holidays, etc.) This time, however, I really did not have a plan! Instead, I decided to make sure all the Practical Life lessons used clear vessels. In this manner, the child can have full visual access to any material placed inside. As it turned out, the pouring lessons ended up with plain water (no colors added) while the spooning, tonging, and dry pouring work all ended up with colorful items! Here is a peak at some of the lessons which await the children upon their arrival to school after the long weekend:
Tonging: Sorting by color...
...green and yellow.
Spooning: Sorting pom-poms...
...into jars. How adorable is this butterfly tray? I bought six of them for a dollar each!
Spooning pony beads: I found these jars way back in my cabinets and decided to leave the lids on for the lesson - it provides an added point of interest for the child because now, they must open the jar (and close it at the end)!
Tonging: Sorting pony beads by color...
"Color-fun!"
A clothespin/color-matching activity I made a very long time ago...
...which the children still enjoy today!
It came to my realization after setting up the lessons, that some of the works have sound (pony beads) while others are silent (pom poms). This lead me to the idea to set up a Sound/No Sound lesson for the Science area of the classroom... more on that later though - I just wanted to share with you how some of my ideas are generated.
I will also be sharing some of the new Art lessons set up as individual activities as the children are introduced to them. Those will be coming over the next days and weeks, so stay tuned....!
There was a box of "goodies" on my doorstep when I came home from school the other day...I had ordered some new materials for the classroom and one of the purchases was a set of Superimposed GeometricFigures. This Sensorial material consists of three sets of squares, circles and triangles in varying colors (red, yellow, blue) and sizes. One of the reasons I made this purchase was because I appreciate the creative aspect of the material. Once the child is introduced to the language of "inscribed" and "concentric" shapes in the initial presentation, he is free to further explore the relationship between shapes and figures.
The set of material includes three separate boxes of shapes:
The boxes arrived as pictured above (not pictured are the lids for each box): Each box contains all three shapes in the same color with different sizes.
If one were to place all three boxes on the shelf in the classroom, it would be too overwhelming for the children. These boxes not only need to be introduced one at a time, but they also must be prepared for the initial presentation. For this reason, I rearranged the shapes into the boxes like this:
The figures arranged according to form. Now, each box contains only one shape in varying colors and sizes.
The first time I introduce this lesson, I will only use the first box (squares) to introduce the words, "inscribed" and "concentric":
The first box of Superimposed Geometric Figures.
While preparing for the Oral Examinations in June which will complete my Montessori training, my husband recorded me giving the initial presentation to our oldest son one evening at home. It consists of a Three-Period Lesson for showing "inscribed" and "concentric" shapes.
Once introduced in the classroom, I will be curious to see how the children will respond to this material! Also, I would be most interested to hear how others have used or are using the Superimposed GeometricFigures in your classrooms or homes!
...this is what was happening during our Montessori work sessions:
Extension work with the Solid Cylinders: This material aids in developing discrimination of size while promoting the pincer grasp used in writing. While you can't see it from this photo, the children working on this decided to try to complete the exercise blindfolded. You can see the child's left thumb "feeling" the edge of the hole to find out if the cylinder he placed there fits...
Constructive Triangles: Triangular Box. You can learn more about this activity here.
Learning about the phonogram -ch with the Small Moveable Alphabet.
Adjective lesson with the Farm Animals and Grammar Symbols.
Exploration with the Pink Tower and Brown Stair.
Art Appreciation with Child Size Masterpieces.
Yes, more Constructive Triangles! This is the Large Hexagonal Box.
The children cannot get enough of these Golden Beads! Here, each child (total three) chose a number from each category themselves and used Dynamic Addition to find the sum.
Geography: Labeling the continents. For this lesson, I write the name of the continent, the child reads it, then places it on the corresponding continent. I love this simple activity because not only are the children reinforcing their geography and reading skills, but it also provides the child an opportunity to watch the process of writing.
Practical Life: Folding Cloths
Having fun with words using the Logical Adjective Game
Recycling cut and paste activity (read about it here).
More Golden Bead work - This time the children wanted to "start with the big number and make it smaller," so we had a Static Subtraction lesson....
...followed by a Dynamic Subtraction lesson.
Labeling the states on the Puzzle Map.
So many of the youngest members of our class want to use the Farm! Most of the young ones are not quite ready for the grammar lessons for which the Farm and animals are used. For this reason, I adapted the material to meet the needs of this particular child. I wrote one letter on a small piece of paper and the child and I made its sound. Then, the child found an animal with the corresponding beginning sound. After six or seven letters, I mixed the objects and the letters and had the child match them up again. What fun for a little one learning letter sounds!
Learning about the power of words and symbolizing phrases. Here, the children have completed a lesson about conjunctions. The phrase in the photo reads, 'the pink pencil and the blue pencil and the green pencil and the red pencil,' which have been tied together with the pink ribbon. The tying of the ribbon demonstrates the action of the conjunction 'and.'
A full table of activity! What a joy it was to see this group of children so attentive in their lessons!
Last week, the children were introduced to a sorting activity having to do with recyclable items (which you can read more about here). Over the weekend, I remembered another lesson I had last year having to do with the same subject. While I try not to have the children in my class do too much "paperwork" or worksheets, I do feel that some children really enjoy these learning opportunities. Also, the kids in my class are very much enjoying the sorting lesson and I thought the following activity would be a natural extension. The best part is that I already had the papers stored away from last year and only had to make a few extra copies before showing them the lesson at circle time. Afterwards, I set up the materials at a table as an individual lesson which the children can complete during our Montessori work sessions.
Recycling Cut and Paste Activity.
To do the work, the child cuts on the line, determines whether or not the item in the picture can be recycled, and glues it under the appropriate heading. I demonstrated the activity in its entirety at circle time and the children loved it! In fact, they all had the chance to practice their Grace and Courtesy because each child had to be patient and find something else to work on until the person before them was finished with this work! It was a joy to watch the children's concentration as they cut on the lines and determined where the picture should be placed. Some of them engaged in pleasant conversation with those around them, "This is a cardboard box. Can it be recycled?" "Yes!" "Hey, what's this banana doing here? I can't recycle a banana!"
Lesson completed.
The crowning moment came after lunch: One child finished his fruit cup (the kind that comes in a plastic container...) and stood up to throw it in the trash can. He got to the trash can, stopped right still, and declared, "I can recycle this!" He proceeded to rinse out the cup and place it in the box with the other items from our first sorting lesson. Now that is what it is all about!
A couple of weeks ago, Mr. Man came home from school with a painting rolled up in his backpack. As I unrolled the paper, I immediately noticed the eye-catching colors and deliberate angle of lines. I looked closer and saw a door with windows, flowers in the garden and white posts around a brown deck. All around were beautiful trees, fresh with spring green...Mr. Man had painted his home! Each time I look at this artwork, a smile spreads across my face and my heart is warmed because I am so touched that this is how he sees his home, sweet home.
Mr. Man's painting of our home. (Sorry for the glare...)
In other art news, Big Stuff accompanied me to the classroom one Saturday morning and was impressed by the Pollack- inspired drip painting which the children recently completed (which you can read about here). I guess it really left an impression on him because the next day, I found him in our kitchen with a jar of water, a brush and all of his watercolors. He was immensely enjoying the process of splattering watercolors on his paper (luckily, he remembered to put some newspapers all around!). He repeated this splatter process with a few different colors and declared, "Now, it has to dry until tomorrow." I thought he might forget about his self-initiated project as the day progressed and he immersed himself with other activities. The next morning, however, I found him again with the watercolors - completely having a great time splattering away! Once he was finished, he presented the painting to me and said, "This is for your classroom, Mom." Now this colorful painting adorns a wall at school and each time I see it, I reminded of the very reason I started my little Montessori school!
Each month, I try to vary the Art activities placed on the shelves to provide a variety of lessons and opportunities to practice specific skills. During the past weeks, the children in my class have been creating Bean and SeedMosaics. This lesson allows a child to practice not only their gluing skills but also develops and refines the pincer grasp while simultaneously enhancing concentration and coordination. I also appreciate how the activity fosters creativity and self- expression.
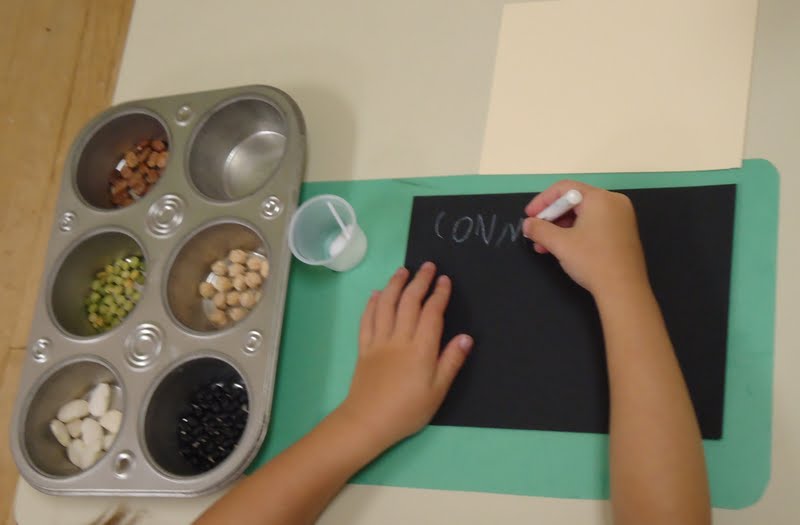
Materials for making a Bean and Seed Mosaic: Tray with beans/seeds; muffin tin; glue mat (under muffin tin); white (or light colored) crayon for writing name on black paper; paper divider with cream colored paper which is slightly smaller than the black paper (both colors are heavy cardstock); gluing materials (small condiment cups and q-tips cut in half).
The child has set up the materials and writes his name on back of black paper. Note: The muffin tin and glue are placed to the left of the workspace to promote the training of the eye in movement from left to right (reading/writing preparation).
The child places small amounts of glue in corners of light paper, turns it over and presses it onto the black paper. This creates a simple frame or mounting for the artwork...
Glue is placed on the front of the light paper and....
...the beans and seeds are pressed onto the glue.
I have been continually amazed at the thought and care the children are putting into their mosaics. It is interesting to observe how some children will naturally design patterns and lines while others simply enjoy the process of gluing.
Some finished mosaics in our hallway - each one just as unique as the child who made it!
Learning about adjectives with the Grammar Farm and Grammar Symbols.
Exploration of language with the Small Moveable Alphabet using the phonogram -oy.
Word-building with the Moveable Alphabet.
Playing the new math game (which you can read about here).
Completion of the Puzzle Map of the USA.
An extension of the Biology Puzzles: Tracing puzzle pieces to cut out and glue onto paper.
Practicing fine motor control while building concentration with the Screwdriver Block.
Working with the Constructive Triangles: Small Hexagonal Box. Read more about the Constructive Triangleshere.
Flower Arranging.
Practical Life: Using a water dropper to fill, then empty, an ice tray.
More Constructive Triangles: "Sliding" the shapes with Box B.
Developing the tactile sense and lightness of touch (preparation for writing) with the Touch Boards.
Understanding numbers 1-9 with the Short Bead Stair.
More exploration of form with the Geometric Cabinet shapes.
Having fun with the recycling lesson (as seen in the previous post).
We were a happy, busy bunch indeed! And despite all the cool, dreary weather, we were able to get our outdoor time on most days during the week... Let's hope for the sun to come out soon!