Showing posts with label Food Preparation. Show all posts

Wednesday, March 6, 2013

Cucumbers, anyone?

We were due for a new change in our Food Preparation lesson - our apple chopping work has remained popular over the months, but we really needed a variation!   Enter the Asian-themed tray, heart-shaped cookie cutters, and cucumbers:

Tray for placing cucumber slices, two cookie cutter hearts (different sizes), cutting board, and toothpicks.

Here the child has taken the necessary materials to a table...

...and using a cutter to make a cucumber heart.  We have two different sized hearts so that they child may determine which one best fits the size of the cucumber slice.  
Placing toothpicks on each cucumber...

...to offer to some friends!

Thursday, November 17, 2011

"The Best Snack, EVER!"

Our 'Thanksgiving Gratitude Snack', AKA "Cornucopia Snack!"
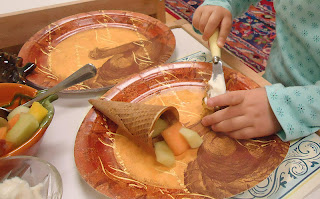
According the my students...!  The children shared a special 'Thanksgiving Gratitude Snack' today.  This was a special event, not only because we sat altogether to enjoy each other's company over food, but also because we took the time to think about the things we are thankful for.  To mark this special holiday, the kids prepared their own cornucopias, which were sugar cones, and filled them with fruit salad.  We have been discussing how the cornucopia is a symbol of abundance and serves as a reminder of everything for which we are thankful.  In addition to assembling a cornucopia, each child was able to frost a pumpkin cookie.  As you can imagine, this was met with much enthusiasm and glee!  The following is a picture of how I set up the snack preparation table with the materials necessary for the cornucopia and cookie icing.

First, the child takes a plate and one "cornucopia."  Then, they fill it with the fruit salad.  Next, they take a cookie and spread on some yummy icing - they did really well with this and resisted temptation to use too much icing! :)

'Thanksgiving Gratitude Snack' in the making, and next to the table for some inspiration...

...our Thanksgiving poetry basket along with a pilgrim lady decoration.  She has been aptly named by the kids, "Cornucopia Girl."  :)

Giving thanks together at the first set of tables...
...and at a larger table.  Notice the wheat stalks for centerpieces?  They are representative of the "yellow fields of grain" from our "Thanksgiving" poem.
In my perfect Montessori world, I would have had the children cut and prepare the fruit salad themselves.  These days however, have been passing much too quickly, and with the upcoming week long vacation, I found myself without enough time to have the kids do that part!  So, I am writing with much gratitude and thanks to the parents who graciously sent in the fruit salad and festive plates and napkins. The kids declared, "This is the best snack, EVER!"

Throughout their time eating together, the following cheerful words were heard from the children:  "I am thankful for the whole wide world."  "I'm thankful for my whole family!"  "I'm thankful for my food."  "I'm thankful for this classroom."  "I'm thankful for everything!"  :)

Friday, July 29, 2011

Red Raspberries

 This week, the raspberries were ripe for picking in our yard:


Here's what we made with some whipping cream and ginger snap cookies:


And the layered effect:


So simple for the kids to make (and delicious for eating as well!).  While we were making them, I realized how easy this would be to set up in the classroom for a tasty Practical Life exercise.  I think I'll have to try something similar when school begins...perhaps the blueberries will hold up for us come September!

Wednesday, July 20, 2011

We're "Jammin'!"

Last year, the children received a most generous gift from their grandparents - two apple tree saplings and two blackcurrant plants.  This year, we have reaped the rewards of tending to the newest additions of the landscape and have made our own blackcurrant jam!

Ripe blackcurrants in our front yard begging to be picked...
 

The most time consuming part was removing the blossom end from each blackcurrant.  We ended up with 2 1/2 C. of currants which we boiled with about 1 C. of water. Next, we added 1 C. of sugar and roughly 1 1/2 T. of lemon juice and boiled for ten minutes.

Look at the exquisite color!
After the mixture boiled , I conducted the "plate test."  Before we started boiling the water, I placed a small plate in the freezer so that by the time it was needed, it was already chilled.  After the mixture boiled for ten minutes, I put a small amount on the plate and put it back in the freezer.  If the jam gels after one minute in the freezer, the jam is done - ours was ready!

 Homemade blackcurrant jam.
It looked so savory that I could not resist making some fresh bread - fresh from the bread machine, that is...


Scrumptious!

...and some for the neighbors too!

Friday, July 8, 2011

Rhubarb Anyone?

Last week, Mr. Man returned from an outdoor "expedition" in the backyard proudly displaying the "giant leaf" he had found.  What he did not realize however, was that he had discovered a delicacy of summertime - fresh rhubarb! 
 
A treasured find:  Fresh rhubarb!
 Each year around this time, we see it growing everywhere which serves as a perfect opportunity to make everything rhubarb.  Lucky for my dear husband, who celebrates his birthday in early July, he usually is presented with some sort of rhubarb dessert on this occasion.  This year, we celebrated with 'Rhubarb Torte' whose recipe is a family favorite!

4 C Chopped rhubarb
1 C Sugar
3 T Cornstarch
1/2 C Water
(few drops of red coloring)
Cook until thickened.
 
Place in Graham Cracker pie crust and cool. 
 
Mix 1 C Whipped Cream with 1 1/2 C tiny marshmallows.

Prepare a package of vanilla pudding...

...and layer on top of the rhubarb in the graham cracker crust.  Sprinkle top with crushed graham crackers.

YUM!

Friday, May 6, 2011

"Muffins for Moms"

Each year, the children in my class host a Mother's Day event, "Muffins for Moms."  Prior to this august occasion, the children busily prepare - baking muffins, making 'fruit kabobs,' as well as making their individual gifts and cards.  This year was no different and the children and families look forward to this annual special event.  While I did not get the chance to take any pictures of the food preparation to share with you, the kids took pride in baking muffins for their moms.  Also, we set up a 'fruit kabob" table during the past two days and the children were able to assemble grapes, cantaloupe, and strawberries onto to toothpicks to serve their moms with the muffins.

I appreciate the special nature of such an event as it truly gives the parent an opportunity to observe their child in a Montessori setting.  Often times, they are amazed by the child's ability to simply pour themselves a drink or even more so, watch them clean the dishes!  In this manner, the child is also able to share with their parent a meaningful  part of their day. 

During our "Muffins for Moms,' event, each child  invites their mom to a special treat of muffins, fruit and orange juice.  The child sets the place mats, napkins, etc. and serves their mom and themselves this tasty treat.  Once they have enjoyed their snack together, the child cleans everything up and invites them to one of their favorite activities in the classroom.  Needless to say, the moms are always thankful and welcome the chance to spend time with their child in the classroom.  At the end, the child presents their mom the Mother's Day gift and card. 


Happy Mother's Day!

Thursday, April 21, 2011

Easter Kulich and Pascha

"Every Russian Easter table, from the most modest to he most lavish, has as its center - Kulich and Pasha - the most awaited and special of the traditional Russian foods.  Each family has a treasured recipe for these delicious treats which are first sampled on Easter Night and may be served only during the Easter celebrations."  (From Babushka's Kitchen)

As I wrote in this post, thanks to my mom, who has already sent us a Kulich, we only had to make the accompanying Pascha to complete our Easter Table. 


Key ingredient - Farmer's Cheese.  I love how the price tag indicates, "Russian Gourmet!"

Mixture of Farmer's cheese, sugar, and butter - and next to it, my 'secret recipe,' hand written by my mom.

Mixing the heavy cream...

Adding the best part - vanilla, straight from the bean!

Lining the wooden Pascha mold with cheesecloth...and realizing that we used only 1lb. of Farmer's cheese and not 2 which this mold requires. So...

...a variation on a theme - Clay Flower Pot!  Now, the Pascha will drain for a couple of days while setting in the clay pot (which conveniently already has a drainage hole in place!). 

You'll have to wait until Easter to see the finished product on our Easter Table!  In the meantime, I know three very excited children who, "just can't wait 'till Easter!" to take part in this festive tradition.

Easter Eggs

We've been busy in the kitchen today.  First, we dyed our eggs in the Eastern Orthodox tradition using a red egg dye.  Then, we used "shrink-wraps" to create Slavic style Easter eggs. 


And after all was said and done...


These eggs, along with the traditional kulich and pascha will be featured at our Easter table on Sunday morning.  Now, onto  making the pascha...