Thursday, March 31, 2011

Ocean Animals' Visit

Today, we had the delightful experience of learning about ocean animals with live organisms!  Thanks to the dedicated individuals at the Marine Environmental Research Institute (MERI) of Blue Hill, Maine, the children were able to explore a touch tank in our own classroom.  They had plenty of knowledge to share and were completely engaged in their learning.  Here are some of the special friends we got to know today:


Sea Stars - The small one was in the process of growing a new arm!

A mussel (and a green crab which cannot be seen here...).

A rock crab and the shell of a horseshoe crab.

A sand dollar.

A (very) large sea clam.

A Jonah crab (also very large and elicited squeals of delight!).
 And this (stuffed-taxidermy) seal was also a guest of honor, although I'm not sure if the children realized it was real!


A friendly guest!
The MERI center in Blue Hill boasts an educational touch tank complete with additional live specimens including lobsters, urchins, and sea anemone.  For those of you in the area, it is definitely worth a visit! They also hold various classes for children which you can read about here. We were thankful for this educational outreach program and the children gained much insight into the topic.   Also, it was most fitting during our cross-curriculum study of oceans within our Montessori setting.   

Tuesday, March 29, 2011

'Ocean Animals' Booklets

We have been discussing the ocean during the past few weeks and the children have taken advantage of many opportunities around the classroom to integrate their knowledge.  For example, we have been pouring and spooning sand in Practical Life exercises and counting shells for lessons in the Math area.  The children also created beach-inspired pieces of art using sand which you can read about here.  After reading about the lovely booklets over at My Montessori Journey, I thought it might be fun for the children to make little Ocean Animal booklets as an interesting, meaningful way to incorporate the theme into our Language lessons. 

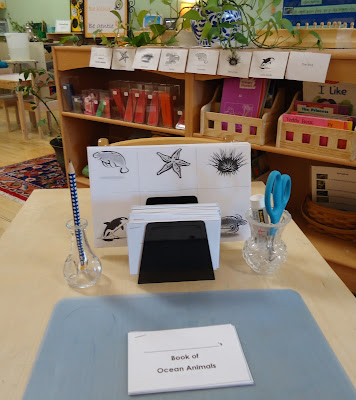
At first, I was a bit hesitant to put out a "paper" work because I really feel that the children already learn so much using just the traditional Montessori materials.  I noticed, however, that the kids are extremely motivated to make little books from their activities and take much pride in their creation.  To that end, I put together a booklet making lesson using a simple table in Word and pictures from Clip Art.  Each page of the booklet has one word of an ocean animal whose corresponding picture is on the other sheet of (larger) paper.  I decided to pre-assemble the pages of the booklets because I wanted even the youngest students in the class to have success with the material and I did not want them feeling overwhelmed by the prospect of having to put all of the pages in order.  The students were given a lesson during circle time and then I set the activity up at a table in the Language area of the classroom.

The materials at the table:  pencil for writing name, paper divider with pre-assembled booklets and page with pictures to cut out, pair of scissors and a glue stick.  The blue (art) mat protects the table surface and defines the workspace.  Animals in the booklet:  manatee, sea star, sea urchin,  orca whale, lobster, sea turtle.

For control of error, I placed the pages in order on a shelf so that the children could check their work:


Here, you can see how the control of error can be seen from where the child sits to complete the activity:


The children have been working hard to compete their booklets.  The concentration on their faces as they carefully cut around the pictures is priceless!  Also, they are really paying attention to the words on the page and those who are not yet reading were even trying to sound out the first letter of each word.  Usually, the students place their finished work in their work bin inside the classroom, but these have become coveted items and most get tucked away inside a pocket because they are special treasures!


Saturday, March 26, 2011

Thoughts About "Work"

During the AMS conference yesterday, I attended a workshop entitled, "Concepts of Work in Society and in our Classrooms."  This title piqued my interest given that people are often confused and somewhat alarmed when they hear Montessori teachers refer to the children's activities as "work."  Montessori strongly believed that what the children do in the classroom is extremely important and wanted to place emphasis on the meaningful activities which are completed by the child.  The "work" of the child allows the development of attention and leads to a normal child, i.e. a child who is calm, actively interested in her environment, aware of and responsive to others, and internally motivated to explore.

The main question is this:  When was the last time you saw anywhere, either on T.V., in the news, in real life..., where hard work is glorified?  If one thinks about it, everywhere we look, we find messages that working or having to exert effort, is a bad thing.  As a result, we have generations who have grown up with a sense of entitlement and the feeling that to have to work at something is a negative experience.  To this extent,  I feel it is critical to teach children the value of a job well done and the true meaning of working hard at something.  During the workshop, I was reminded that this can start earlier than the Primary years - even a toddler is capable of helping out and learning about work.  Through simple activities and helping around the home, a young child begins to internalize these concepts. 

My hope is that the "work" completed by the children in my class builds not only their concentration, coordination, independence, and order, but also develops their confidence and becomes a source of JOY in their lives.   

Work is a good thing!

Wednesday, March 23, 2011

Off to the 'Windy City'

I am looking forward to participating in the Annual Conference of the American Montessori Society this weekend in Chicago.  Prior experiences at this conference indicate the need to be super-organized...the thousands of attendees coupled with endless workshop options prompted me to put together my own conference notebook:


Yes, the tabs are color-coded by day, dividing options for each workshop session.  I've already highlighted the sessions I plan to attend, saving time when I'm there...
 And just in case the need arises, I made these business cards from a free template online:


Tradition dictates that I bring back at least one special item for the classroom...I wonder what it will be this year!  I also have plans for next year's conference in San Francisco and am processing my proposal to present a workshop based on my STEM Research...stay tuned!

Sunday, March 20, 2011

Sound Works

Big Stuff has been engaged in a second grade activity about sound.  He is a hands-on boy and loves science.  Needless to say, it has been delightful to watch him get excited about his project. 

Last week, he came home with the directions:  The student is to create an instrument, using only items from around the home, which do the following three things: 

1.  It must produce sound.

2.  It must change pitch.

3.  It must change volume.

(Can you imagine the exuberance of Big Stuff's scientist father?)

Here is what Big Stuff came up with:

 
Making sound: Striking a large, water filled goblet with a butter knife.
Sound was produced by the vibrating glass having been struck with the butter knife.  He found out that if he tilted the glass, the shape of the water inside went from a circle to an ellipse.  This made the sound lower which meant the pitch changed.  He compared this to the strings on a melody harp - When the strings were tightened, the sound was higher.  When the strings were loosened, the sound was lower.

Experimenting with sound and strings on the melody harp.
But what happened if there was no water in the glass?

Striking the glass with no water.
The sound was louder! So, how could the pitch be changed without water in the glass?  He tried this:


Rubbing the rim with a wet finger.
And that produced a sound that was the same as when he struck the water-filled glass.  So, how about this?


Rubbing the rim of a smaller glass with a wet finger.
  
The pitch was higher! 

Through his various experiments, Big Stuff discovered the elements of sound including, pitch, volume, and resonance (thanks to the last part with rubbing the rim of the smaller glass...). 

Friday, March 18, 2011

All in a Week's Time

During our time in the classroom, I try to get snapshots of interesting activities throughout the mornings.  Often, I am in the middle of a lesson or watching from afar when something incredible happens...and I just can't get to the camera.  I also feel, however, that I shouldn't rush to the camera!  In any case, here are some photos of happenings around the classroom this week which I was able capture.


Caring for plants.


Metal Insets - one shape in two positions.
  
Puzzles - Parts of a Flower

 
More puzzles - Parts of a Turtle


Saltwater vs. Freshwater experiment (see this post)


Playing the Memory Game of Numbers (with shells).

Preparing banana slices to offer to our friends.  (A perfect Grace and Courtesy lesson!)


Exploring shapes and geometry with the Constructive Triangles.


Learning about the decimal system with Cards and Golden Beads...


...and the Formation of Large Numbers.

Static Subtraction with the Golden Beads.

Making a Continent Booklet with stamps and colored pencils.
 
Counting our "Lucky Pennies."  (see this post)


And a flurry of activity with Pink Tower and Brown Stair Extensions:


Thursday, March 17, 2011

Counting our Lucky Pennies

We had fun reading the the story of Pippen's Lucky Penny during the past few days.  This book has been around for many years and I enjoy reading it to the children around St. Patrick's Day.  The elf-like character, Pippen, reminds me of a tiny leprechaun while the lucky penny prompts our "luckiness" on St. Patrick's Day.  It is just a light-hearted read and the children thoroughly enjoy it..."Read it again, again!"  is what I hear most often afterwards!


This story lead us to a presentation of a celebratory "Lucky Pennies" counting activity.  This consisted of felt shamrocks, each with a number 1-10, and 55 pennies.  I made these out of regular craft felt (the stiff kind) and the pre-cut numbers had sticky-backs - super simple to make!  The beautiful Lilly-of-the-Valley tin which holds the pennies came from a fancy soap.  I just love its size and shape!  Also,the pennies make such a lovely sound when the kids place them in the tin...aah, the joys of a Montessori teacher...! 


Here is the lesson as it appears on the shelf...
 
...and here is what it looks like when complete.

Happy St. Patrick's Day!


Wednesday, March 16, 2011

Sand Art

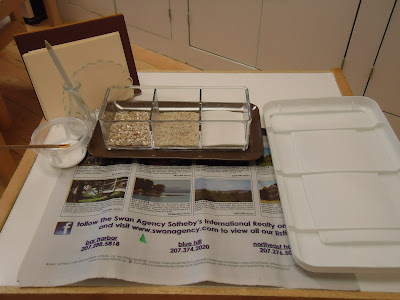
In an effort to think "warm thoughts," and to integrate an ocean/beach/summer theme, we have been working with sand in different areas of the classroom.  There are different types of sands for spooning and pouring in Practical Life and shells for counting in Math.  I thought it would be fitting for the children to be able to work with sand and bits of shell in an artistic, creative way as well.  The following activity is set up at a stationary table in order to maximize the sensorial element of the lesson - I wanted the children to simply not have to worry about carrying the materials to the workspace...they are able to do that with other lessons throughout the classroom.  Here, it is all about the tactile experience with the sand types while expressing creativity and self. 


From left to right:  Dark colored tag board and smaller sized cream colored oak tag in shell-shaped napkin holder.  Small jar with white pencil for writing name on dark paper.  Container of glue with brush for application.  Three-sectioned, clear container with three varying types of sand:  coarse, medium, fine.   White cover of shoe box (for carrying the work to drying rack when the child finishes).  The  newsprint protects the workspace.


First, the child chooses one piece of dark colored paper, writes their name with the white pencil, and turns it over placing slightly to the right of the workspace.  Then, they take one piece of cream colored oak tag  and place it to the left of the dark paper. 


The child then applies glue to the light paper and turns it over onto the dark paper, creating a frame for the art work.  Next, the child applies glue to various places on the cream paper.  Now, they are ready to start exploring and creating with the different types of sand!


When the child in finished, they place their work onto the white lid and carry it over the drying rack.  Once the glue is dry, the excess sand is shaken off into a box.  Here is what they look like hanging in our hallway:


 Happy, warm, "beachy" thoughts!

Tuesday, March 15, 2011

Saltwater vs. Freshwater Experiment

As part of an ongoing project for my training coursework, I decided to introduce the children to an experiment with saltwater and freshwater.  I thought this would be an ideal time to cover the topic given that we have been talking about the beach/ocean and have been integrating a "summer" theme into the classroom. 

We have been discussing various types of bodies of water for some time and the children know about rivers and lakes.  Through their prior knowledge, they were able make connections with the different type of water we find in an ocean.  I presented this lesson at circletime to a very excited bunch of kids!  "Oh!  An experiment, I love experiments!" 

First, we filled the bowls with water.  Then, we added salt to one of the bowls.  We used popsicle sticks to take a "taste test" of the different types of water.  Their faces were priceless as they discovered the taste of the salt water!  Next, I showed an egg and asked what they thought would happen if we put it in the freshwater.  Then, we placed it in the bowl and watched it sink.  I asked what would happen if we placed it in the saltwater and then, to the delightful amazement of the kids, we watched it float!

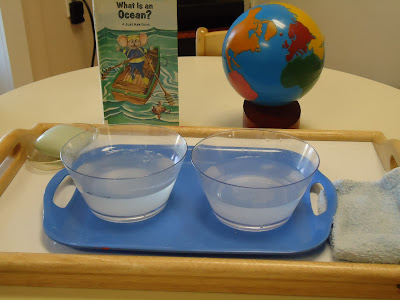
I explained to the children that I would set this activity up at a table, but rather than using an egg, they could use a bar of soap.  Here is the lesson set up at a table:


Saltwater vs. Freshwater:   bar of soap in soapdish; two bowls of water - one with salt added; small towel for wiping any spills and drying fingers.  I added the book for interest and a globe so that the child could visualize the concept of 'oceans'.
 
"It floats in saltwater!"


Sunday, March 13, 2011

Signs of Spring

There are hints of spring in the air and signs all around us!  Mr. Man asked to have the windows open while we were driving around town yesterday - the air felt so fresh and the sun so warm!  Upon arriving at home from our errands, we found a time capsule of sorts - a newspaper from January 22nd which was uncovered by the melting snowbanks at the end of our driveway!


A burst of energy reveals a new turf without snow!
                                                                          
What would Spring be without climbing a tree?

 
The granite steps greet us again at the front door!

And the garden squirrel emerges with glee....
 
...while lion must wait 'til he is camoflaged no more!